Archive
Blog Archives

Paths (skips in the Menu Cycle)

Paths (skips in the Menu Cycle)

1.
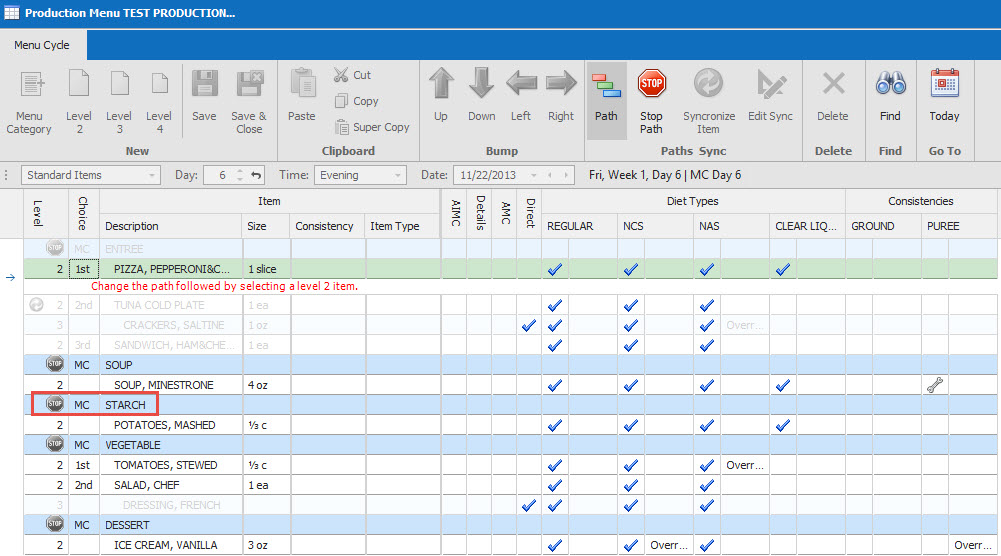
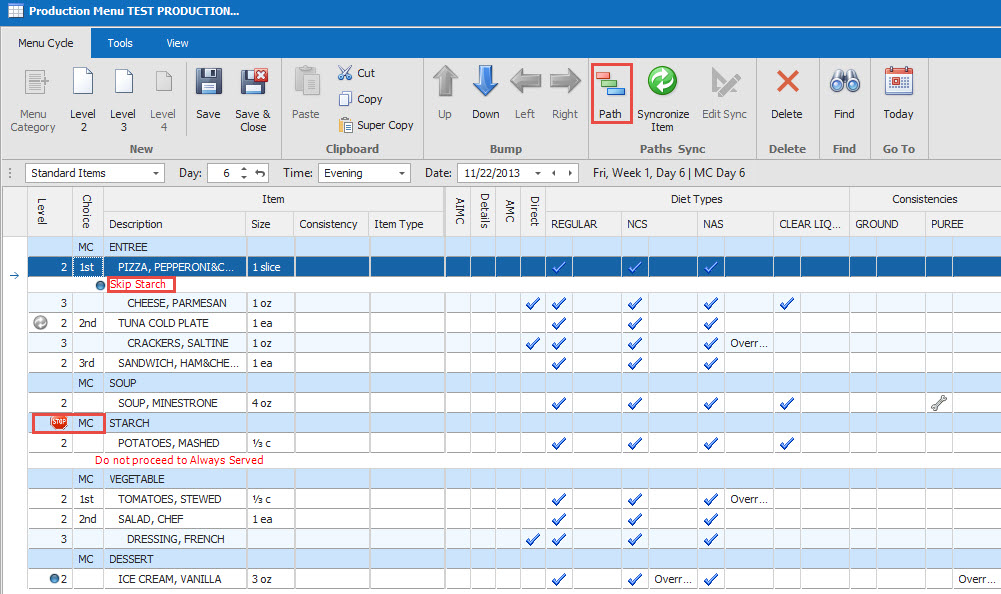
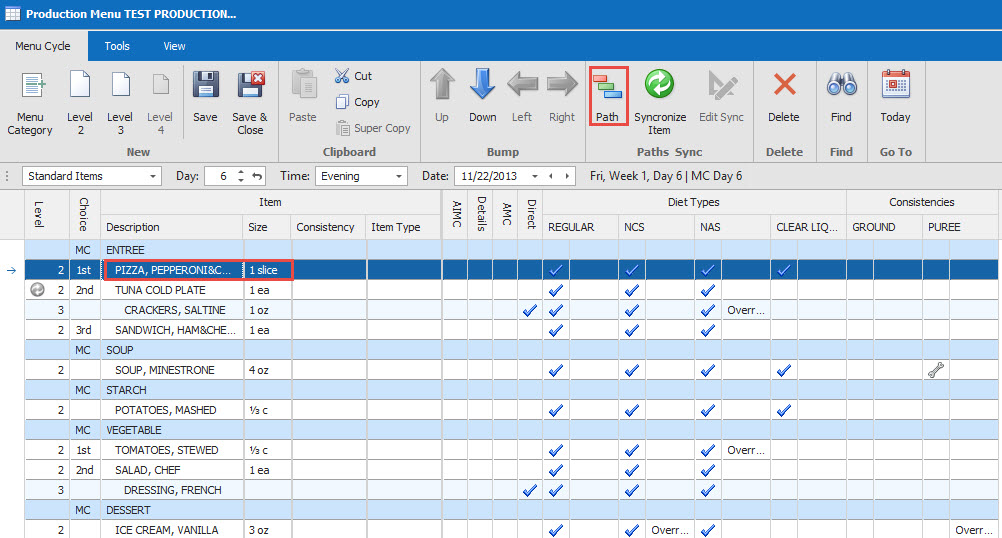
Click on the item that is going to skip another menu cycle (like in the image—Pizza, Pepperoni would skip the starch). And then click on the Paths Icon.
2.
Click once to focus on the Menu Category (MC) that will be skipped and then click again and you will notice grayed out stop sign appears next to each of the Level 1/MC (in the image the MC of Starch is being skipped if you get the Pizza).
3.
Click on the grayed out stop sign (turning it red) now you will notice under your item that is skipped the MC is saying (in the image is says Skip Starch). Once you have completed your skips for MC, click back on the Pats icon to complete your action.
4.
When all of the changes are done make sure you Save the changes.
  • |
  • October 28, 2019

Discharging a Resident

Discharging a Resident

1.
Resident goes to the Hospital (short stay).
From the Resident Data Grid, click to highlight the resident being discharged. At the top of the page, Click on
2.
You will be asked if you want to discharge that resident. Click Yes. The resident’s name will still appear in the resident listing, and you will see a check mark in the column of ‘D” which stands for Discharge. The resident will not have a tray ticket, or be counted in a production tally. If you accidentally discharged a resident, or if the resident returns from the hospital, you can click on the Readmit icon.
3.
Resident goes Home, or to Another Facility, is discharged from the hospital, or Expires
From the Resident Data Grid, click either the delete button on your key board or the delete icon in the tool bar. The program will ask you twice if you (1) Are you sure you want to delete the selected resident? (2) Are you sure you want to delete the selected resident?
4.
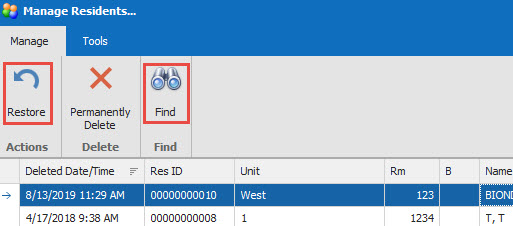
The resident will no longer appear in the resident listing. If the resident happens to return from home or another facility, their information can still be recalled as long as they have not been “Permanently Deleted”. The resident can be recalled by going to the Manage (recycle icon), find the resident (you can utilize the find icon), and click on Restore. Close the Manage Resident Grid, and your resident is now located on the Resident Data Grid. Verify their information and re-assign them to tray-line (print order for the tickets)
  • |
  • October 24, 2019

Meal Pattern Icons

Meal Pattern Icons

If you hover over an icon it will give you a description of what the icon does.

New. Use the drop-down arrow to create a New From Existing item. (Meal pattern/adjustments).
Global - add in a Global to a meal pattern or adjustment (or multiple meal pattern items/adjustments).
Print – allows you to print a meal pattern to your screen for a resident.
Tray Ticket Visualizer – shows a screenshot of what the resident’s tray ticket will look like, you can also choose the date and meal, and you can print that one tray ticket.
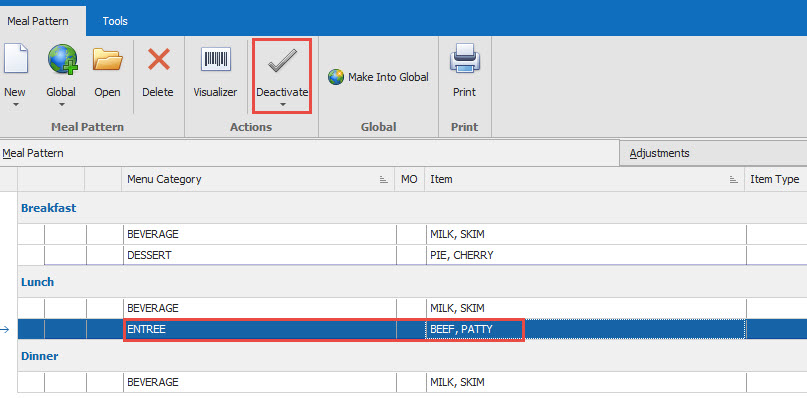
Deactivate. Toggles between whether a meal pattern or adjustment is active or inactive
Meal Pattern - Item History - Under Tools, you can see the history for a selected item (who changed it and when), as well as deleted items.
  • |
  • October 24, 2019

Deleting Items – Making Items Active or Inactive

Deleting Items - Making Items Active or Inactive

1.
To delete an item in the meal pattern or adjustments, click on the item to highlight it and then press Delete on the keyboard. The item will no longer appear in the meal pattern. If you want to add it back in, you have to complete all the steps as if it were a new meal pattern item or adjustment.
2.
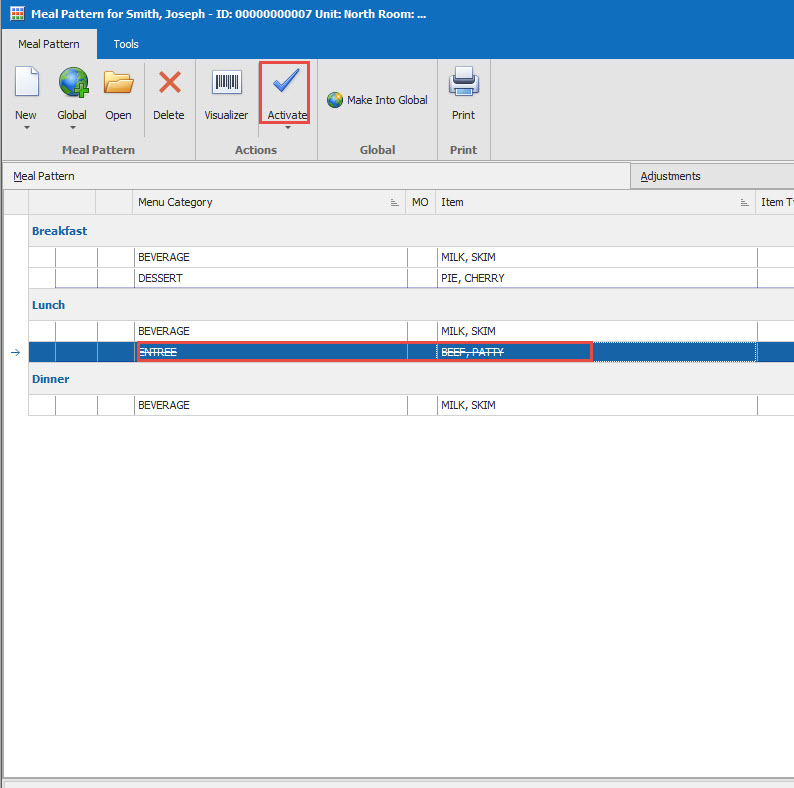
You can make items active and inactive by highlighting the item and clicking on the check mark icon (see below) at the top of the screen. When you make an item inactive, it leaves it on the screen but crosses it out. You can go back at a later time to make that item active again. This is preferable to deleting items for residents who frequently change their minds.
  • |
  • October 24, 2019

Entering Dislikes (Adjustments)

Entering Dislikes (Adjustments)

1.
From the meal pattern screen, click on the long Adjustments tab at the top to make sure you are in the correct place to enter dislikes/adjustments. There are 2 ways to enter in dislikes/adjustments.
2.
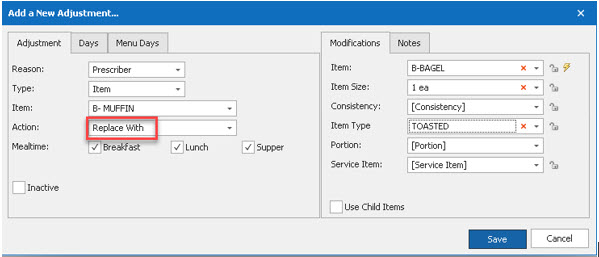
Entering dislikes is like entering standing orders. You can use the new icon (first way) or the global icon (second way). Dislikes will be set as “Prescriber” for the Reason and “Never Serve” as the Action however to modify any dislike, you double click on the item. This will open the “Modify Adjustment” box and you can make changes as necessary. 
**Never Serve and Next Available function the same way but use Never Serve when selecting an action.
If you choose “Replace With” as the action, you will be prompted to choose another food group or item to replace the one you selected.
3.
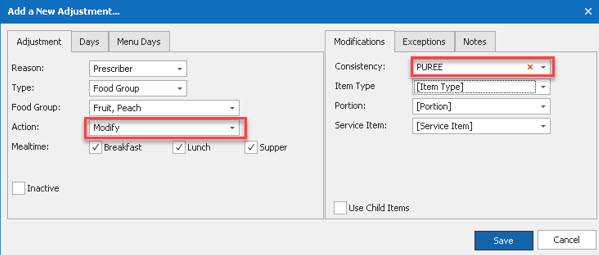
For a consistency Override USE MODIFY, it is an available Action if you are giving an item that is not consistent with the diet the resident is on. For example; a resident needs puree peaches when peaches are on the menu. So, you choose the food group of peaches and modify it to a puree consistency.
  • |
  • October 24, 2019

Global Meal Pattern

Global Meal Pattern

1.
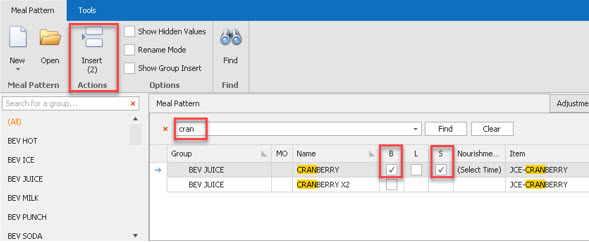
If you are entering multiple standing order items, click on the Globe Icon at the top left of the screen. This will open up the Global Meal Pattern. You can select the category the item is in or you can just select (ALL) to see the list of items to choose from. The easiest way to find an item is to begin typing it in the search box. When your item appears, click on it to highlight it. You can then select the meal(s) you wish to serve it at.
2.
Please note that the Actions box at the top will show a count of the # of items to be inserted. It will count two items if you are serving one item, twice a day.
When you have added all of the standing order items you wish to, click on the Actions button to have the items inserted into the meal pattern. You will see those items now listed in the meal pattern. You can modify items, their child items, and days by double-clicking on the item or using the open icon.
  • |
  • October 24, 2019

Entering Standing Orders (Meal Pattern)

Entering Standing Orders (Meal Pattern)

1.
From the meal pattern screen, click on the long Meal Pattern tab at the top to make sure you are in the correct place to enter standing orders.
2.
If you are entering just one item that is unique and not listed in the global meal pattern (explained later), click on the new icon in the top left corner (sheet of paper). The “Add a New Meal Pattern Item” box will appear. You can create a new entry as “New” or “New From Existing”. New From Existing will create a new entry but copies the information from another entry already in the list that is highlighted. 
For example, if you want to serve a banana at breakfast and lunch, you could add banana to the meal pattern at breakfast. If the banana is still highlighted, you can click “New From Existing” and then you only need to change the meal or nourishment time (everything else will be filled in).
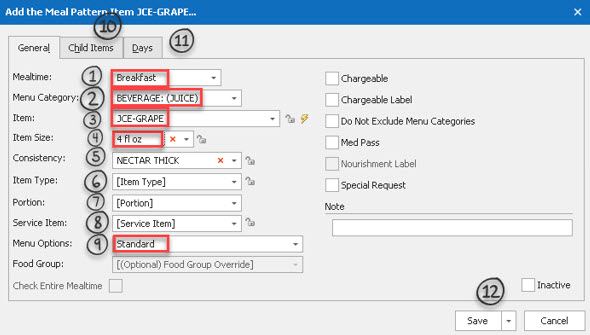
Fill in each drop down box appropriately for the item you wish to add to the meal pattern. The boxes outlined in red below must be filled in to add a new item correctly.
3.
1.Choose the Mealtime/Nourishment time
2.Choose the Menu Category (the spot on the ticket where you want the item to appear on the ticket).
3.Choose the item, by clicking in the box and starting to type what you are looking for, then select by highlighting the item.
4.Select the Item Size.
5.Select the Consistency. This should pre-fill in with the appropriate consistency, but if not choose the consistency. Don’t choose regular if the resident is receiving the item in its “natural” condition. You would only choose regular if the resident isn’t a regular texture, but needs the item regular consistency. Ex: a puree who can have a regular banana.
6.Select the Item Type (if applicable).
7.Choose the Portion Size (if NOT a regular).
8.Choose the Service Item (ex: food in bowls, on the side, etc.)
9.Menu Options: Standard – means they will get the item in place of what is scheduled to be served on the menu. In this example, the resident will get a hamburger for the entrée instead of what is on the menu. Add To Menu (ATM) – means they will get the entrée scheduled to be served that day AND the hamburger. Add When No Similar Item Found (ANSIF) – means they will get the hamburger and the entrée scheduled to be served that day as long as the scheduled item isn’t a hamburger. Good for the option of a resident wanting ice cream plus dessert, but they don’t want 2 when ice cream is on the menu.
10.Child Items tab can be used to enter in accompaniments you would like to serve with the main item (ketchup and mustard for example). Items with Child Items assigned to them will be noted in the meal pattern listing with a + sign to the left. 
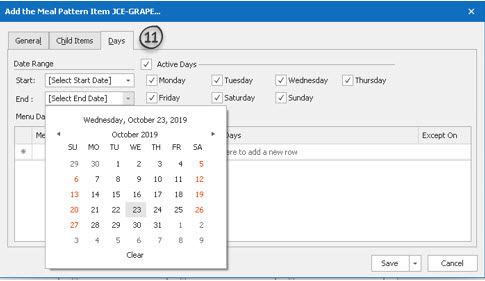
11.The Days tab can be used to schedule the item to be served every day or on specific days. The default setting is EVERY DAY. To specify the day, uncheck the days the item shouldn’t be served. You can also set a date range for when you would like the item to be served by using the Start and End dates. For example, if Mrs. Smith wants ice cream for dessert every day during summer you can set the start date to June 1st and end date to August 31st. The item will automatically start and stop printing on her ticket on those dates.
4.
When all the information has been filled in, click Save. The item you just added will appear in blue on the screen. You can also use the option with the drop down to save to all meals (adding in a banana at BLS).
  • |
  • October 24, 2019

Entering Allergies and Adaptive Equipment

Entering Allergies and Adaptive Equipment

1.
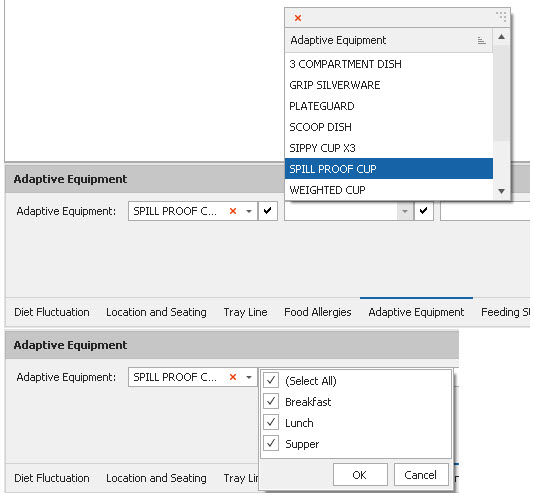
In the Resident’s Meal Pattern, click on the Food Allergies/Adaptive Equipment tab at the bottom of the screen.
To select an allergy, double click in an open allergy box or click on the drop down arrow to open the list of available allergies. Click on the item to select it.
2.
For Adaptive equipment, use the drop-down arrows or click in an open box open the list of available items. Click to select an item. Adaptive equipment defaults to all meals but can be set to specific meals only by clicking on the √ next to the item, and then selecting what meals the adaptive equipment is to be given.
  • |
  • October 24, 2019

Special Needs

Special Needs

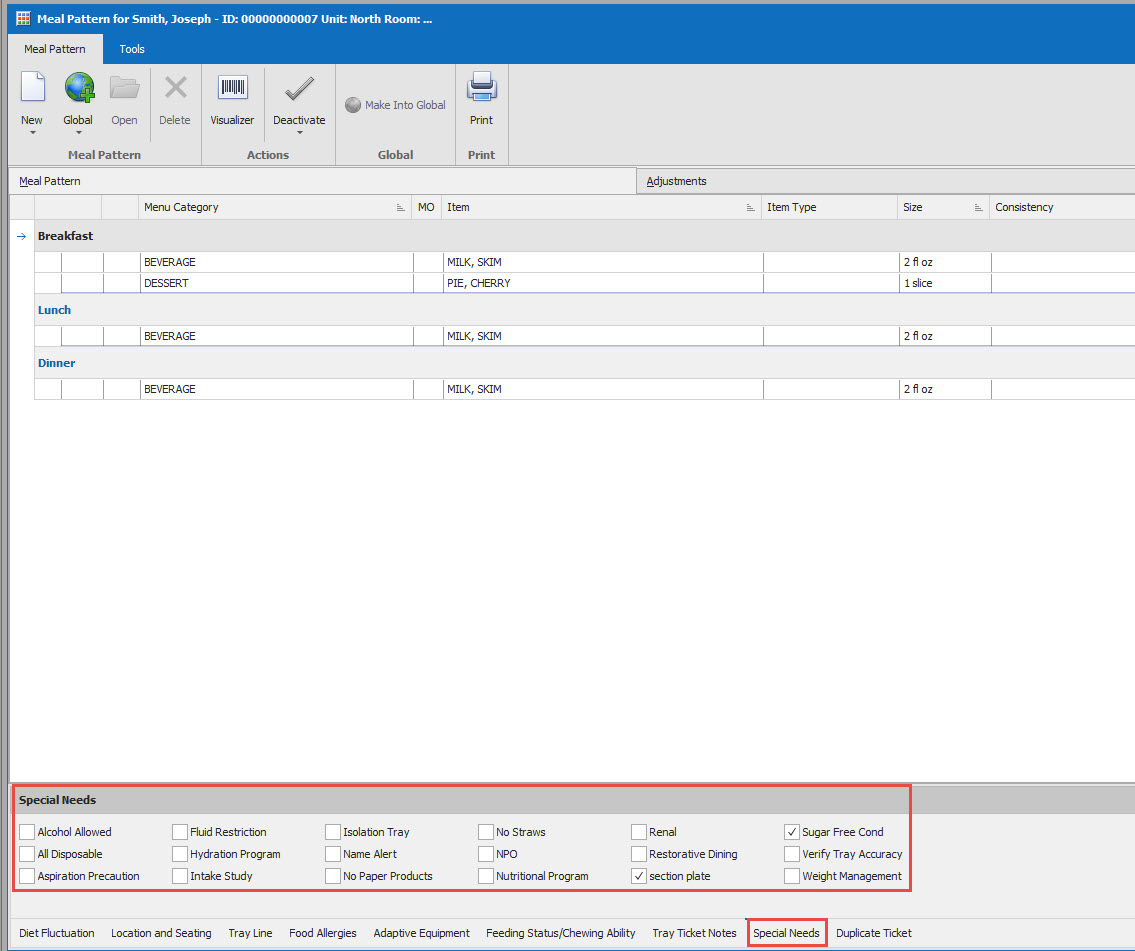
Select the appropriate special need, and a vertical message with appear on the tray ticket. Some special needs note appear automatically; such as “Name Alert” – if there are 2 residents with the same exact first and last name, “NPO” – if a resident is an NPO diet, “Intake Study” – during the duration of an intake study that message will appear on all tickets.
  • |
  • October 23, 2019

Entering Tray Ticket Notes, Duplicate Tickets

Entering Tray Ticket Notes, Duplicate Tray Tickets

1.
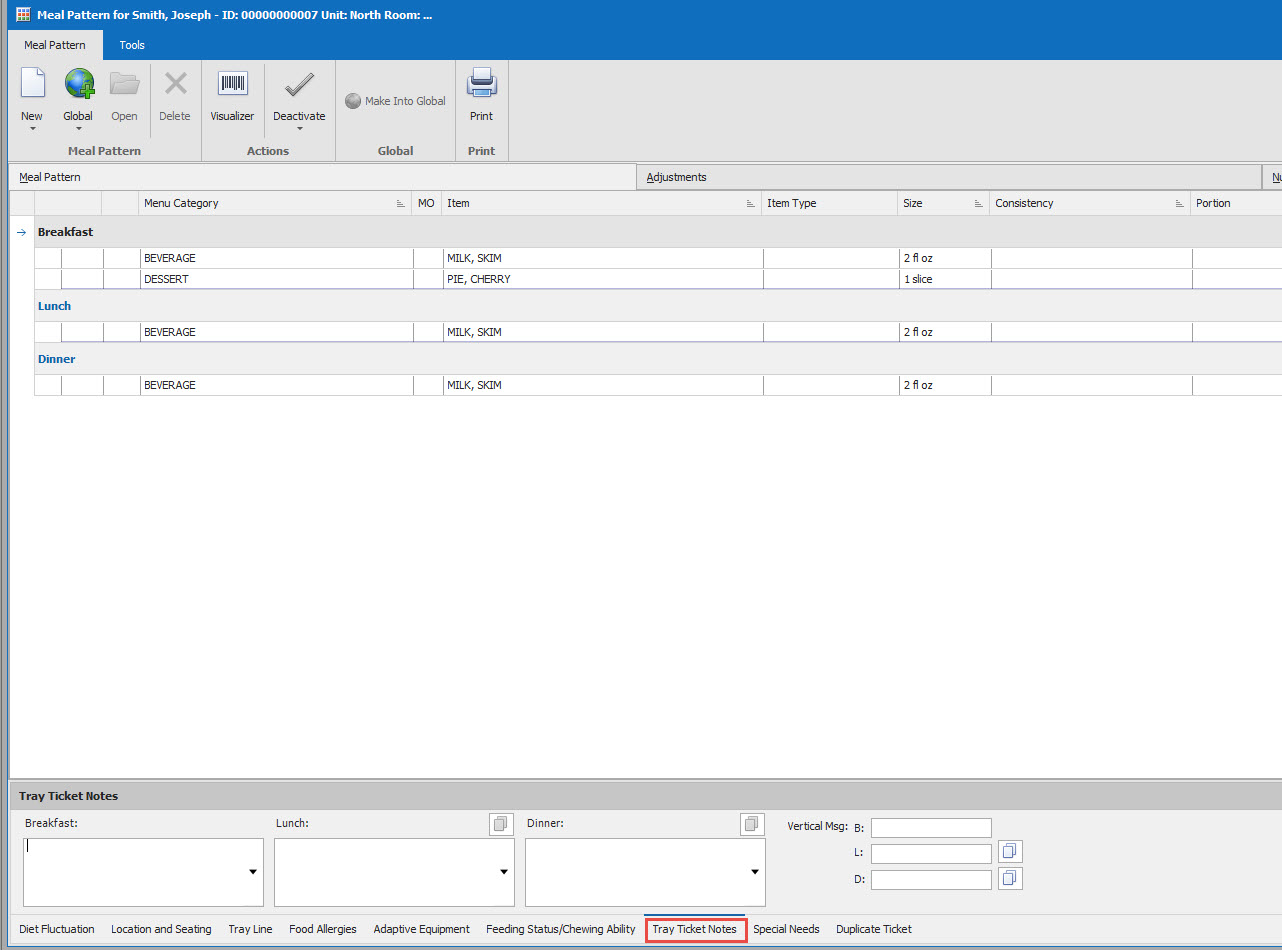
Tray ticket notes are limited to 30 characters. If the same message is for all three meals, you can type the message in at Breakfast, then click on the copy icon next to the lunch and dinner boxes to copy the whole message for those meals.
2.
You can choose to add in a Vertical Message that will print vertically on the tray ticket. You are limited to 12 characters in the vertical message. If the same vertical message is for all three meals, you can type the message in at Breakfast, then click on the copy icon next to the lunch and dinner boxes to copy the whole message for those meals.
3.
Duplicate tickets may be printed by clicking in the box next to each meal you would like a duplicate ticket to print. This will only print a duplicate ticket for the resident whose profile you are currently in. This option is turned off by default. If you choose to print a duplicate ticket, the ticket will say “dup tic” on it.
  • |
  • October 23, 2019